What is a Logo & brand identity pack contest?
The Logo & brand identity pack category helps designers collaborate with clients on larger branding projects. Logo & brand identity pack contests have higher prizes and involve multiple deliverables:
- logo design
- business card
- letterhead
- envelope
- Facebook cover
How the process works:
- Qualifying Round: The logo design is the focus in the Qualifying Round. Do not submit any other deliverables in this round.
- Final Round: The designer finalizes their logo, and can start submitting initial mockups on the additional deliverables.
- Handover: The logo design should be finished! The designer will refine and deliver logo deliverables. The winning designer then delivers the business card, letterhead, envelope and Facebook cover files.
- Prize released: Once the handover is complete, the prize is released to the designer's account.
The deliverables
We’ve created a handy set of editable PDF templates to help designers with the different file sizes:
Organization is very important in the handover phase for Logo & brand identity pack contests. Your final design files should be uploaded in all of the following formats:
Logo files
- JPG, PNG
- Vector PDF
- Adobe Illustrator
Business card files
- Editable PDF
- Adobe Photoshop, Illustrator or InDesign
- For tips, templates and more information, check out our business card page
Letterhead files
- Editable PDF
- Adobe Photoshop, Illustrator or InDesign
- For tips, templates and more information, check out our stationery page
Envelope files
- Editable PDF
- Adobe Photoshop, Illustrator or InDesign
- For tips, templates and more information, check out our stationery page
Facebook cover files
- JPG, PNG
- Adobe Photoshop or Illustrator
- For tips, templates and more information, check out our social media page
What is a logo design contest with extra design deliverables?
We know that many clients come to 99designs for more than just a logo design. That’s why we’ve started selling extra design deliverables at the end of logo contests.
Currently, we are giving clients the option to purchase a brand guide, business card designs, Facebook covers, letterhead & envelopes but this is just the beginning. We plan to introduce more design deliverables as time goes on.
How does the process work?
Once you’ve been selected to move into the final round, you’ll be asked whether you are interested in delivering extra design deliverables to the client in handover.
At the end of a logo contest when the client is about to award a winner, we present them with the option to buy additional design deliverables (if the winning design has already agreed to do so).
If the client purchases additional designs, we immediately notify the winning designer via email with the requested designs (and revised prize amount) and extend the handover period to 10 days to give you more time.
The winning designer can download ready-to-use templates to help complete the additional work. Once the client has reviewed and approved all of the deliverables, the total prize (logo prize + extra deliverable prize) will be released to you as per a normal bundle contest.
What design files should I deliver to my clients?
For all Logo & identity designs, you’ll need to submit the following file formats:
- The original, editable file (i.e. AI)
- A vector EPS file in digital (RGB) format
- A vector EPS file in print (CMYK) format
- A web preview file (PNG, JPEG, PDF)
7 tips for designing print-ready business cards
Business card design is never as simple as slapping the client’s logo and contact info onto a document and sending it off to the printer. There are quite a few things to consider when creating a card – depending on the design, the client and the printing company.
Each job has slightly different specifications, but there are a few fundamental requirements that a designer must fulfill to make a basic print-ready business card. Before you submit your final files to a client, you should ask yourself these questions:
- What are the client’s specs for the project?
- Which design programs should I be using?
- Is the document color mode set to CMYK?
- Are my bleeds set up correctly?
- Have I correctly used any images in my design?
- Did I use my fonts legally?
- Did I save my design in all the right file formats?
Meeting these basic requirements will save you a lot of time, and help you avoid technical difficulties when it comes to printing. Let’s fill in the details.
1. What are the client’s specs for the project?

Requirements a designer must always consider include but are not limited to:
- a client’s budget
- a client’s branding and style
- the selected printing company
- the selected printing materials, including inks and papers
It’s best to try to figure these from the start, especially which printing company the client is using. Many printing companies have different specifications, and it’s important to research those and adjust your design to them accordingly.
Printing companies like Vistaprint and Moo have business card templates available to download from their websites, which make it easy to design to their specifications. Ideally, you should be using those templates to design your business card from the beginning. Unfortunately, many clients will not have selected the printing company out ahead of time, so we recommend asking them to decide on those things as soon as possible.
In the meantime, if you fulfill the following requirements in your business card design, you’ll be able to easily adjust your design to the printing company’s specifications when the client figures that out later. Just don’t jump the gun and spend 12 hours designing a super-fancy, gold-plated, cut-out business card printed on plastic if the client hasn’t asked for it. Your best bet is to start with a basic 2-sided, color business card printed on paper.
2. Which design programs should I be using?

You can design a business card in either a vector or raster program, but you’ve got to make sure that you’re doing it right. Whichever you prefer, many printing companies like Vistaprint and Moo have templates in both vector and raster programs available to download off their websites.
- If you use a vector program, use Adobe InDesign or Adobe Illustrator.
- If you use a raster program, use Adobe Photoshop, making sure that you set the document resolution to 300 DPI.
3. Is my document color mode set to CMYK?
The CMYK color mode is for designs that are going to be printed, like your business cards. It is the default color setting for many of the recommended softwares, but you should always double-check that your document color mode is set to CMYK, not RGB.
Here’s how to check that your document color mode is in CMYK in three different programs. These steps will take you to the colors panel:
- Photoshop: Image > Mode > CMYK Color
- Illustrator: File > Document Color Mode > CMYK Color
- InDesign: Window > Color (When the panel pops up, click on the options button in this panel, and make sure that the CMYK option is checked.)
4. Are my bleeds set up correctly?
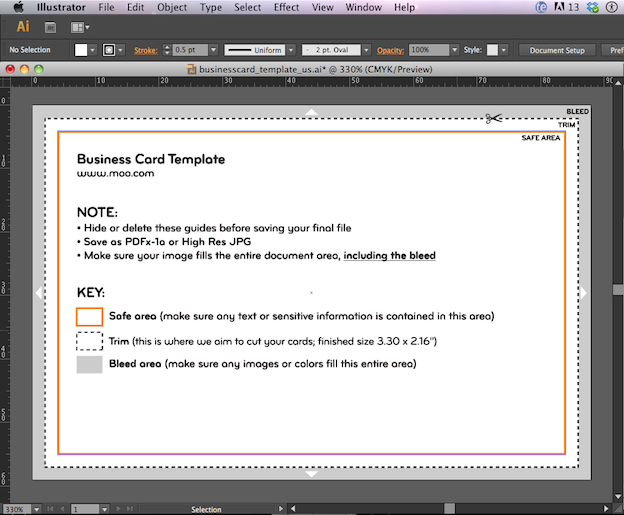
For this example, we’re going to assume that our client wants to print their cards at Moo.com. We’ve downloaded a business card template in Adobe Illustrator from Moo’s website, including a separate file for each side of the card.
The template explains the essential components of a business card file pretty well, but here’s a little more detail:
- The safe area (orange box) is the area inside which you should keep all text and graphics that you don’t want to be cut off by the printing machine.
- The trim (dotted black line) is the line along which the card is going to be cut by the machine.
- The bleed area is the area that is going to be cut off by the machine, but make sure that this area is filled with image and color so that there is no white space left on your card when it is trimmed.
Now that we’ve opened the template file, let’s add our artwork to it:
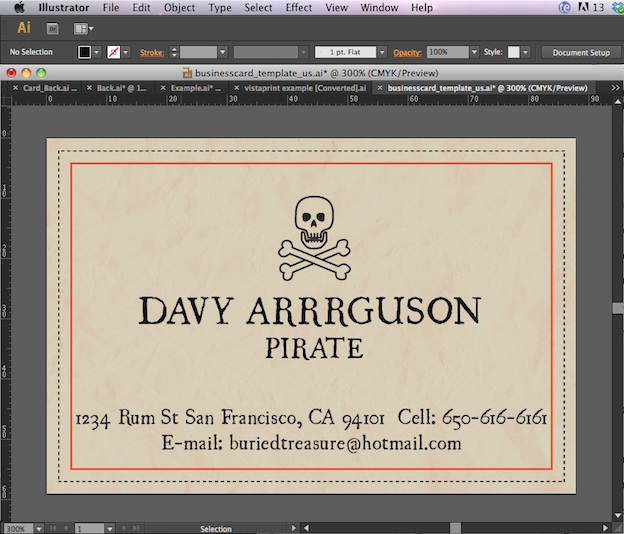
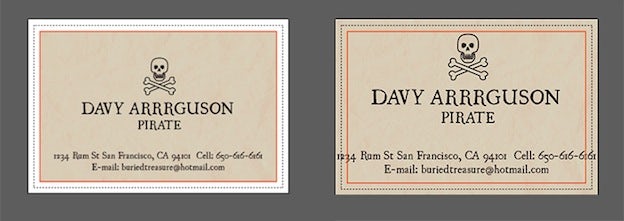
The first example is not full bleed. The background is not fully extended to the edge, which will cause white space to show up along the edges of your card after it is cut. The second shows a card in which the text is not inside the safe area, which will cause the text to be cut off.
These are some pretty common mistakes, but if you make sure that your design is set up correctly according to a template, then it should be easy to adjust your design to your printer’s specifications.
5. Have I correctly used any images in my design?

For this example, I scanned a wrinkled paper bag at 300 DPI for my textured background, and placed it in my business card file.
Not all business cards use photos, but if you do choose to have photos in your design their resolution must be 300 DPI. Therefore you should never use photos dragged off the internet in your design not just because of licensing issues, but also because their resolution would be 72 DPI – screen resolution not print resolution.
To assure high-res prints, use your own photos or 3rd-party photos (remember to declare those) that are at least 300 DPI, and remember to either embed the photo in the illustrator file or include the photo file when you deliver your final files to the CH or printer.
6. Did I use my fonts legally?
For creating business cards, it’s generally considered to be a better practice to embed your fonts in your file instead of creating outlines of your text, because then it’s still editable and it results in higher quality prints. The first step in selecting a font is to check if the license allows it to be embedded in your file.
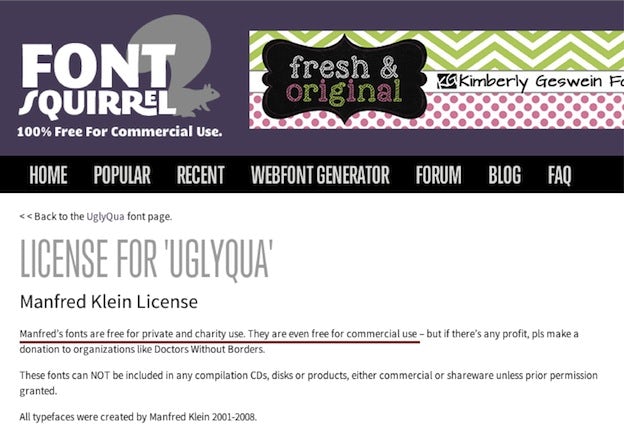
In this example, I used the font “UglyQua,” a free font from Fontsquirrel; therefore I don’t have to worry about embedding restrictions. However, for all fonts that you’ve got to purchase, you need to check if the license allows you to embed the font in your files.


When you save your source file in the PDF format, the program will automatically embed your fonts in the PDF document for you.
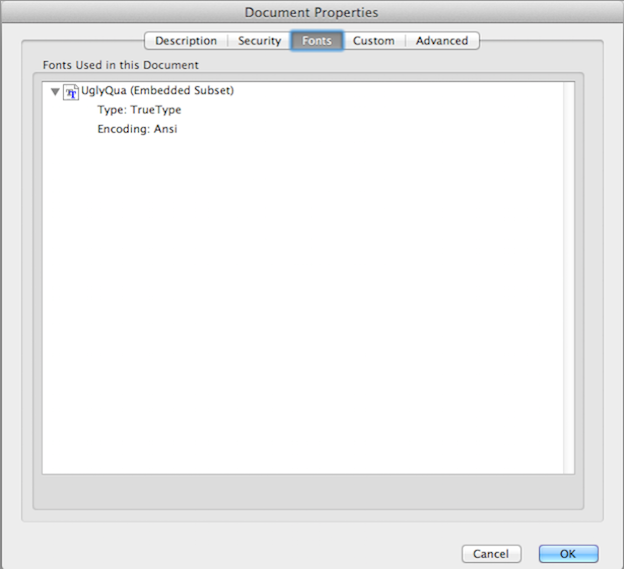
To do this, open the PDF file of your business card in Adobe Acrobat or Adobe Reader and click on File > Properties > Fonts. A window will pop up with a tab showing which fonts are embedded, with labels like “Embedded Subset” or “Embedded.”
Embedding your fonts is a must, but your client still needs to own the font software itself. So in addition, send them a link to where they can purchase the font’s license legally. For example, include something like this in your correspondence with them:
“Hi! I hope you like this font I’ve chosen for your business cards. If you would like to purchase the license for it so that you can legally use it for other projects, you can find the licensing and purchase information at: (link)”
7. Did I save my design in all the right file formats?
Business card designers should always provide the client with these formats:
- AI, ID, CDW or PSD
- EPS
- JPG
- TIFF
If you provide them with all these files, the client should not have to ask you for anything else. Though a PDF file is usually sufficient for a printing, I’ve also included TIFF as a file format to deliver, because some printers will ask for TIFF files.
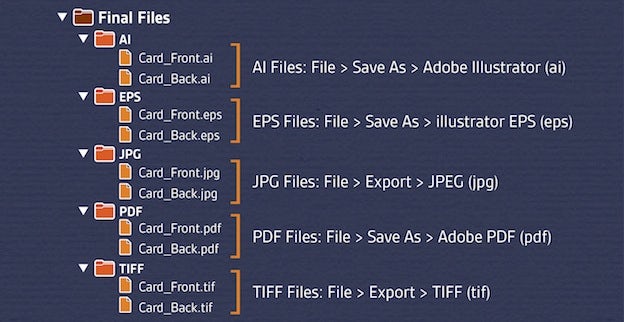
Here I’ve made separate folders for each type of format, with a separate folders for the files for the front and back of the card, and put all these folders inside a larger folder named Final Files.
Finally, submit your files to the client. If the they ask for revisions to the design, keep this same file organization and add the word “Revisions” to your file names, so that the client knows which files to look at.
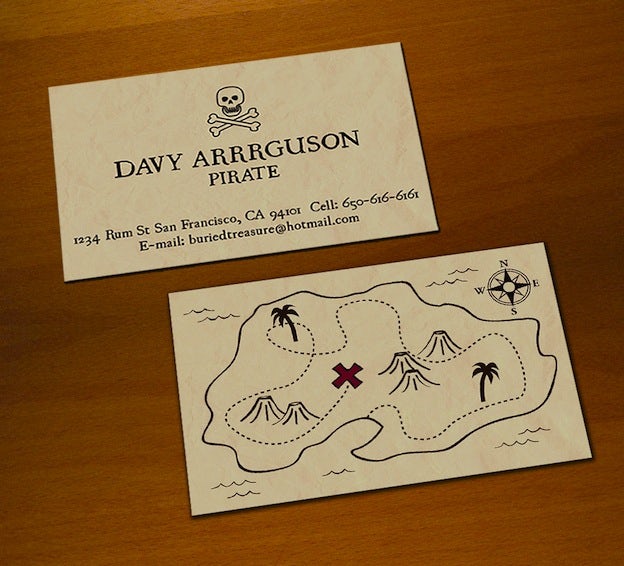
It also never hurts to show your client some sweet mock-ups along the way 🙂
This business card checklist might seem like a lot of work, but it will save you a lot of time in the long run. Following it every time will fulfill the minimum requirements for business card files, and will result in files that are easily adapted to different printing companies and specifications.

No comments:
Post a Comment